In this top 10 Wifi Hacking Tools we will be talking about a very popular subject: hacking wireless networks and how to prevent it from being hacked. Wifi is often a vulnerable side of the network when it comes to hacking since signals can be picked up everywhere and by anyone. Router manufacturers and ISPs turning on WPS by default makes wireless security and penetration testing even more important. With the following top 10 Wifi hacking tools we are able to test our own wireless networks for potential security issues. Let’s start off the top 10 Wifi Hacking Tools with the first tool:
1 Aircrack-ng
Aircrack is one of the most popular tools for WEP/WPA/WPA2 cracking. The Aircrack-ng suite contains tools to capture packets and handshakes, de-authenticate connected clients and generate traffic and tools to perform brute force and dictionary attacks. Aicrack-ng is an all-in-one suite containing the following tools (among others):
– Aircrack-ng for wireless password cracking
– Aireplay-ng to generate traffic and client de-authentication
– Airodump-ng for packet capturing
– Airbase-ng to configure fake access points
– Aircrack-ng for wireless password cracking
– Aireplay-ng to generate traffic and client de-authentication
– Airodump-ng for packet capturing
– Airbase-ng to configure fake access points
The Aicrack-ng suite is available for Linux and comes standard with Kali Linux. If you plan to use this tool you have to make sure your Wifi card is capable of packet injection.

Website: http://www.aircrack-ng.org/
Tutorial: http://www.hackingtutorials.org/wifi-hacking/how-to-hack-upc-wireless-networks/
Tutorial: http://www.hackingtutorials.org/wifi-hacking/how-to-hack-upc-wireless-networks/
2 Reaver
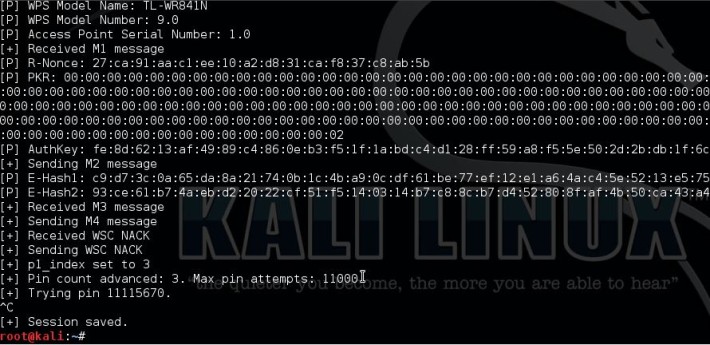
Number 2 in the top 10 Wifi hacking tools is Reaver. Reaver is another popular tool for hacking wireless networks and targets specifically WPS vulnerabilities. Reaver performs brute force attacks against Wifi Protected Setup (WPS) registrar PINs to recover the WPA/WPA2 passphrase. Since many router manufacturers and ISPs turn on WPS by default a lot of routers are vulnerable to this attack out of the box.
In order to use Reaver you need a good signal strength to the wireless router together with the right configuration. On average Reaver can recover the passphrase from vulnerable routers in 4-10 hours, depending on the access point, signal strength and the PIN itself off course. Statistically you have a 50% chance of cracking the WPS PIN in half of the time.
Website: http://code.google.com/p/reaver-wps/
Tutorial: http://www.hackingtutorials.org/wifi-hacking/pixie-dust-attack-wps-in-kali-linux-with-reaver/
Tutorial: http://www.hackingtutorials.org/wifi-hacking/pixie-dust-attack-wps-in-kali-linux-with-reaver/
3 Pixiewps
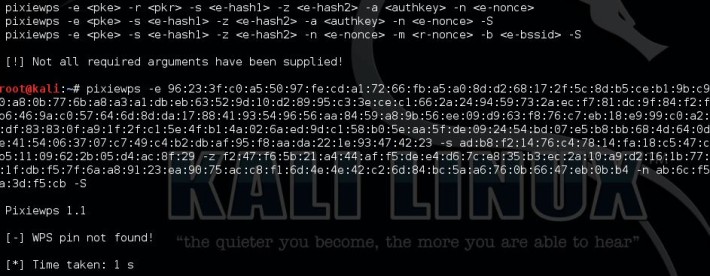
PixieWPS is a relatively new tool included with Kali Linux and also targets a WPS vulnerability. PixieWPS is written in C and is used to brute force the WPS PIN offline exploiting the low or non-existing entropy of vulnerable access points. This is called a pixie dust attack. PixieWPS requires a modified version of Reaver or Wifite to work with. Since this tools has become quite popular in little time, it earns the number 3 in our top 10 Wifi hacking tools list.
Website: https://github.com/wiire/pixiewps/
Modified Reaver: https://github.com/t6x/reaver-wps-fork-t6x
Tutorial: http://www.hackingtutorials.org/wifi-hacking/pixie-dust-attack-wps-in-kali-linux-with-reaver/
Modified Reaver: https://github.com/t6x/reaver-wps-fork-t6x
Tutorial: http://www.hackingtutorials.org/wifi-hacking/pixie-dust-attack-wps-in-kali-linux-with-reaver/
4 Wifite
Wifite is an automated tool to attack multiple wireless networks encrypted with WEP/WPA/WPA2 and WPS. On start-up Wifite requires a few parameters to work with and Wifite will do all the hard work. It will capture WPA handshakes, automatically de-authenticate connected clients, spoof your MAC address and safe the cracked passwords.
Website: https://code.google.com/p/wifite/
5 Wireshark
Wireshark is one of the best network protocal analyzer tools available, if not the best. With Wireshark you can analyse a network to the greatest detail to see what’s happening. Wireshark can be used for live packet capturing, deep inspection of hundreds of protocols, browse and filter packets and is multiplatform.
Wireshark is included with Kali Linux but also available for Windows and Mac. For certain features you do need a Wifi adapter which is supports promiscuous and monitoring mode.
Website: https://www.wireshark.org
Tutorial: http://www.howtogeek.com/104278/how-to-use-wireshark-to-capture-filter-and-inspect-packets/
Tutorial: http://www.howtogeek.com/104278/how-to-use-wireshark-to-capture-filter-and-inspect-packets/
6 oclHashcat
Number 6 in our top 10 Wifi hacking tools is oclHashcat. oclHashcat is not a dedicated Wifi hacking tool and is not included with Kali Linux, but it can do brute force and dictionary attacks on captured handshakes very fast when using a GPU. After using the Aircrack-ng suite, or any other tool, to capture the WPA handshake you can crack it with oclHashcat using your GPU. Using a GPU with oclHashcat, instead of a CPU with Aicrack-ng, will speed up the cracking process a lot. An average GPU can try about 50.000 combinations per second with oclHashcat.
oclHashcat is available for Windows and Linux and has a version for AMD and Nvidia video cards. AMD video cards require Catalyst 14.9 exactly and Nvidia video cards require ForceWare 346.x or later to work.

Website: http://hashcat.net/oclhashcat/
Tutorial: http://www.hackingtutorials.org/wifi-hacking/cracking-wpa-oclhashcat-gpu/
Tutorial: http://www.hackingtutorials.org/wifi-hacking/cracking-wpa-oclhashcat-gpu/
7 Fern Wifi Cracker
Fern Wifi Cracker is a wireless security auditing and attack tool written in Python. Fern Wifi Cracker is the first dedicated Wifi hacking tool in this list which has an graphical user interface. Fern is able to crack and recover WEP, WPA and WPS keys and contains tools to perfom MiTM attacks.
Fern Wifi Cracker runs on any Linux distribution which contains the prerequisites. Fern Wifi Cracker is included with Kali Linux.
8 Wash
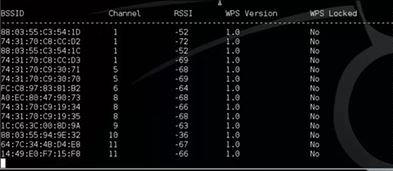
Wash is a tool to determine whether an access point has WPS enabled or not. You can also use Wash to check if an access point locked up WPS after a number of Reaver attempts. A lot of access points locks itself up as a security measure when brute forcing the WPS PIN. Wash is included with the Reaver package and comes as a standard tool with Kali Linux.
Website: http://code.google.com/p/reaver-wps/
Tutorial: http://www.hackingtutorials.org/wifi-hacking/wps-wifi-networks-with-kali-linux-wash/
Tutorial: http://www.hackingtutorials.org/wifi-hacking/wps-wifi-networks-with-kali-linux-wash/
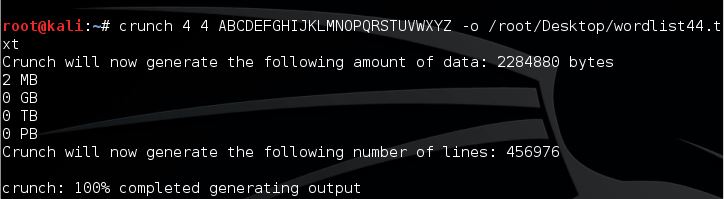
9 Crunch
Crunch is a great and easy to use tool for generating custom wordlists which can be used for dictionary attacks. Since the success rate of every dictionary attack depends on the quality of the used wordlist, you cannot avoid creating your own wordlist. Especially when you want to create wordlists based on default router passwords. Crunch can also be piped directly to other tools like Aircrack-ng. This feature can save a lot of time since you won’t have to wait until large password lists have been generated by Crunch before you can use them.
Website: http://sourceforge.net/projects/crunch-wordlist
Tutorial: http://www.hackingtutorials.org/general-tutorials/password-list-with-crunch/
Tutorial: http://www.hackingtutorials.org/general-tutorials/password-list-with-crunch/
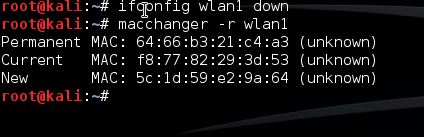
10 Macchanger
Last but not least in this top 10 Wifi Hacking Tools is Macchanger. Macchanger is a little utility which can be used to spoof your MAC address to a random MAC address or you can make up your own. Spoofing your MAC address for wifi hacking might be necessary to avoid MAC filters or to mask your identity on a wireless network.