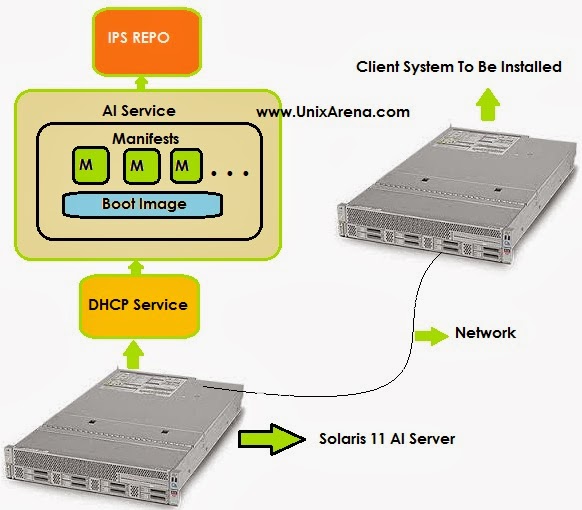
In this post we are going to see how to install and configure oracle Solaris Automated installer. What is Automated installer ? The Automated Installer is used to automate the installation of oracle Solaris 11 on X86 and SPARC architecture over the network.The below picture will describe how the AI works. AI is replacement for Jumpstart server which was exists in the previous version of Solaris.
Required components for AI server:
1. Solaris 11 Server (Physical or Zone)
2. 1GB minimum physical memory and 1GB Disk Free space for the server.
2. 1GB minimum physical memory and 1GB Disk Free space for the server.
2. It should be configured with Static IP and default router.
3. IPS (Image packaging system) repository to be configured locally.
Pre-configured Elements:
1. IPS (Image packaging system) – Follow this article.
Once you have configured the local repo, then execute below commands to set the repo with http service.
Note:192.168.2.31 is server IP(UAASIS).
2.Enable the DNS multicast .
3.Verify the IP configuration like below. DNS is not mandatory .if you are interested to configure the DNS, check out here.
Name: UAAIS.arenadc
Address: 192.168.2.31
root@UAAIS:~#
Address: 192.168.2.31
root@UAAIS:~#
Installing the AI server packages:
1.Install the AI packages using IPS.
As per the above command output, the AI packages are already installed on the system.
2.Verify the installed AI packages.
2.Verify the installed AI packages.
Configuring the AI server:
1.This IPS repo is configured with X86 packages .So the below command is going to create Automated Installer service for X86 architecture. This command automatically configures the local DHCP for PXE client installation.
Note:If you want to configure the repo for SPARC systems ,then you need to download the SPARC repo DVD from oracle website and configure it how we have configured the IPS repository for X86
3.Add the client MAC address of system which needs to be installed solaris 11 through network.
4.Verify the AI client information.
5.Verify the below services are online or not.Please make it online.
Are we done it ? NO. We need to remove the oracle as publisher from the configuration.Otherwise the automated installation will fail with below error.
Creating IPS image
Error occurred during execution of ‘generated-transfer-1341-1′ checkpoint.
Failed Checkpoints:
generated-transfer-1341-1
Checkpoint execution error:
Framework error: code: 6 reason: Couldn’t resolve host http://pkg.oracle.com/
Here is the Fix:
1.Get the manifest information.
2.Export the default manifest associated with SO11x86OS .
3.Edit the configuration file which you have exported like below.
4.Update the manifest.
Open the client Machine console:
1.Power on the machine and boot from the network by setting the first boot device as network for X86 machines.For SPARC machines, from OK prompt , “boot net:dhcp – install “
2.You will get below screens when the machine get;s IP from DHCP server.
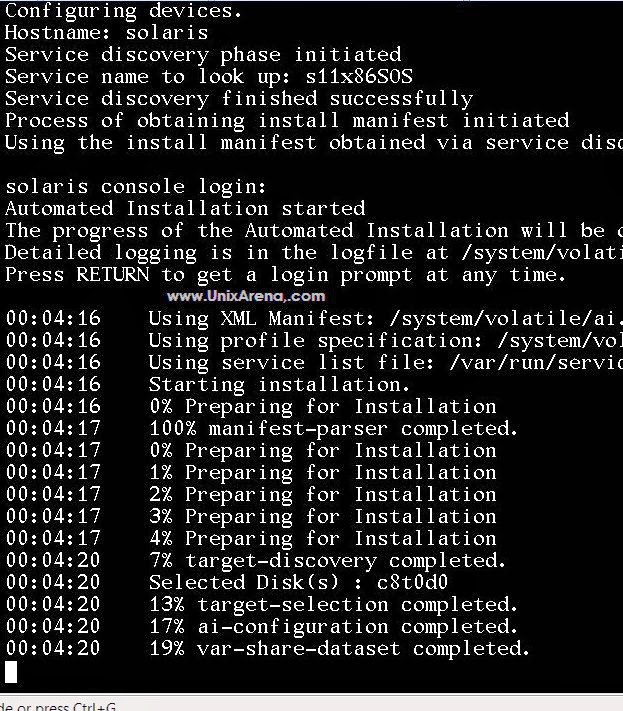
3.Here are the couple of client installation screens.
Reboot the node and configure the system for use.
The installed machine credentials will be
user name:root
Password:solaris
Note:If you want to configure the repo for SPARC systems ,then you need to download the SPARC repo DVD from oracle website and configure it how we have configured the IPS repository for X86
-n s11x86SOS ————————> Service Name
-p solaris=http://192.168.2.31/ —> IPS repo server.
-i 192.168.2.51 ———————-> PXE client IP’s start from this range.
-c 1————————————-> Only one IP to be allocated to the clients.
If you want to create a customized image for AI service, refer this article. (Last Part)
2.Verify the installer service
-p solaris=http://192.168.2.31/ —> IPS repo server.
-i 192.168.2.51 ———————-> PXE client IP’s start from this range.
-c 1————————————-> Only one IP to be allocated to the clients.
If you want to create a customized image for AI service, refer this article. (Last Part)
2.Verify the installer service
3.Add the client MAC address of system which needs to be installed solaris 11 through network.
host 000C29C44245 {
hardware ethernet 00:0C:29:C4:42:45;
if option arch = 00:00 {
filename “01000C29C44245.bios”;
} else if option arch = 00:07 {
filename “01000C29C44245.uefi”;
}
}
root@UAAIS:~#
hardware ethernet 00:0C:29:C4:42:45;
if option arch = 00:00 {
filename “01000C29C44245.bios”;
} else if option arch = 00:07 {
filename “01000C29C44245.uefi”;
}
}
root@UAAIS:~#
4.Verify the AI client information.
5.Verify the below services are online or not.Please make it online.
Are we done it ? NO. We need to remove the oracle as publisher from the configuration.Otherwise the automated installation will fail with below error.
Creating IPS image
Error occurred during execution of ‘generated-transfer-1341-1′ checkpoint.
Failed Checkpoints:
generated-transfer-1341-1
Checkpoint execution error:
Framework error: code: 6 reason: Couldn’t resolve host http://pkg.oracle.com/
Here is the Fix:
1.Get the manifest information.
2.Export the default manifest associated with SO11x86OS .
3.Edit the configuration file which you have exported like below.
4.Update the manifest.
Open the client Machine console:
1.Power on the machine and boot from the network by setting the first boot device as network for X86 machines.For SPARC machines, from OK prompt , “boot net:dhcp – install “
2.You will get below screens when the machine get;s IP from DHCP server.
3.Here are the couple of client installation screens.
Reboot the node and configure the system for use.
The installed machine credentials will be
user name:root
Password:solaris


4 comments:
Great Post with valuable information. I am glad that I have visited this site. Share more updates.
Spoken English Classes in Medavakkam
Spoken English Classes in Chennai Velachery
Great post. Thanks for sharing.....
Importance of Artificial Intelligence
AI advanced Concepts
Mindblowing blog very useful thanks
Software testing training in OMR
Software testing training in chennai
This post is so interactive and informative.keep update more information...
Ethical Hacking Course in Tambaram
Ethical Hacking Course in Chennai
Post a Comment